Back at it.
Hey, hello, hi.
It’s been awhile. A lot has been going on. It’s taken me 3 years to decide on a paint color for our half bath off the kitchen #lifedecisions. Think I have it narrowed down.
WHITE….Accented with white trim and white blinds. Whoa. Don’t get me started with how outrageous that is.
The plan: white walls and trim with brass accents. Possible white backsplash if I can find the right tile.
The vanity top: keeping the tan granite (against my will), replacing the cream under mount sink with a white sink.
The vanity: Gonna try my luck again and take the 10 step refinish for the cherry wood and paint it a light grey with enamel paint…possibly chalk paint.
The hardware: replacing all polished chrome with polished brass. YAAAASSSS!!! (Including faucet, of course).
Lighting: replacing overhead lighting with polished brass fixture….also adding two polished brass and ORB sconces on both sides of the mirror (new Mirror yet to be determined).
Commode: replace with a new white Kohler fancy model.
Floor: remains the same.
Should be a simple little makeover. Looking forward to this project. I need this little pep in my step. Bring it on!!!
Laundry Room Gets The Axe
Verdict is in on the new laundry room.
When we began the whole “let’s build a garage and move our driveway” project, we decided to check into the cost of adding a new laundry room in the old garage space. The quote came back last week and we decided not to move forward. It wasn’t a “we wavered back and forth” NO. It was a BIG FAT NO. The main issue is our plumbing. We would have to jack hammer the floor of our current garage and then dig a trench all the way to the opposite side of our property (about 100 feet) in order to tie into the main sewer drain. 5K just for plumbing. Are you kidding me?! Not happening. On top of the 5K we had to add up the cost of framing, electrical, dry wall, tile, cabinets, sinks, fixtures, etc… which wasn’t awful, but then when you combine that with the exterior changes that would need to be done (take out the current 2 car garage door, brick up that wall, add a gas line (our dryer is gas), and frame out/buy/install a new single car garage door) it became insane. It’s just waaay too much money on something that probably won’t add much value to our house. Its minimal square footage so it wouldn’t add anything in that aspect either. Return on investment is Just. Not. there.
It’s sad to think I had such a beautiful space designed in my head (and on Pinterest) that won’t come to fruition. But in all honestly I would rather spend that much money on something a little cooler than a laundry room. I don’t even like to do laundry. So it’s final. We will continue to use our small but highly functional laundry room in the basement. And I am totally fine with that. I’ve never thought it was a bad space. It’s actually pretty glorious compared to the unfinished laundry room we had at the old house!

During the 5 months of foundation repair I had the grand idea to take out a small wall in the basement. It separated the 2nd basement bedroom from the living space and work shop. We knocked it out, had our electrician put in an extra recessed light, and the contractor dry walled it. It really opens up the space where the laundry room is….now if we would get our but into action to wipe down the walls, get to priming, and lay some missing tile….

So what does all this mean? It means we are going to have a ridiculously large 4 car garage. We still will hang some cabinetry and move our basement fridge into the space, there just wont be a washer and dryer, or walls to keep it all company…And the dogs will continue to get bathed in the 1965 blue guest bathroom upstairs 😜.
On a side note, I started cleaning up the mess our foundation guys left in the basement. I spent 5 hours scraping dry wall plaster and concrete from our tile floors in the guest room, storage room, and bathroom downstairs. After I mopped the floors (several times) and wiped down the walls I was able to get a coat of primer on all the walls and trim. Next up? Tackling the rec room. that space is huge and will require much more motivation. Then paint colors. Oh what color(s) to paint? Painting is my (really weird, somewhat therapeutic) happy place.
Garage Details.
The garage addition is 28 feet long. That’s a lot of feet. It’s about 4-8 feet longer than a normal garage. Go big or go home, I guess…. Once the wall gets knocked out between the existing garage and the new addition, the entire garage will be approximately 48 feet deep. Crazy Big. Our initial plan was to have a space big enough that we could also store our boat in the winter. I guess we imagined cleaning and tinkering with it (?). That will never happen.

Now enters crazy idea #108. Should we try to add a laundry/mudroom to this space?? Currently our laundry room is in our finished basement. It’s small, but it’s a nice space. Nothing’s really wrong with it except it’s in the basement. I’m always thinking re-sale. And it would add a lot to this house if there was a main floor laundry room. When we designed our master bedroom we made sure to allow for 36” doorways to keep it handicap accessible and designed the shower without a curb for the same purpose. If we add a laundry room to the current garage it would essentially make our house almost 100% handicap accessible, therefore appealing to older home buyers or families with small children. When we met with our contractor, who is Roger Spaulding by the way (we keep getting asked that question), he let us know adding laundry facilities might be a bigger (which equals more expensive) project than we thought because of drainage. If we have to tap into the drain on the other side of the house it will be a forgotten project. In my head this laundry room will consist of white cabinetry to match the kitchen, marble countertops, a glass subway tile backsplash, a ridiculously large white apron sink to wash the dogs, a coat closet (which already exists in the space), and room for our extra fridge.
 http://www.entirelyeventfulday.com/2013/08/laundry-rooms-to-kill-for-not-that-i.html?m=1
The plan, if it happens, is for the contractor to complete the shell (including drywall, electrical, and plumbing) and we will finish the space ourselves. But obviously that won’t happen until we hear about drainage. So there’s that.
On the outside, we have 2 separate car bays, both over sized at 9’x7’. The garage doors will be carriage style in a walnut finish with black wrought iron hardware and an arched window design up top. This is probably my favorite element of the project. And more costly than I imagined.

We will purchase 3 more light fixtures to match the one next to our front door and they will be placed between each bay. I had considered placing them above each door but decided to stay more traditional.

Above the garage doors there will be a metal awning supported by decorative corbels. Originally I had planned copper, but now I’m thinking a black/brown metal might tie into the black shutters nicely. Luckily, one of my best friends own a metal roofing company so I’m sure he’ll give me the family discount …haha.

On the gable (which will mimic the other side of the house) we will add Hardie Shingle siding which will hopefully break up all the brick and add a little texture. The Hardie Shingle siding will also be added the gable on the other side of the house for balance. As of now I plan to paint the shake siding a medium grey (if it doesn’t come in the color I want).

I’d also like to add some type of decorative trim at the very peak of both gables.

The side wall of the garage (facing the house) will have 2 windows (we are re-using the ones from our existing garage) centered in the middle. The ground space in front of the windows will become a large flower bed, butting up to the patio and walkway. I imagine building some kind of trellis for climbing plants to grow on either side of the windows. We also plan to transplant the Japanese maple that the foundation workers tried not to destroy/kill somewhere in this area.

The other side of the garage (the side facing the busy main road), will remain mostly the same. Depending on the laundry room outcome, this space is still a big question mark. If we can build the laundry room we will remove the existing 2 car garage door and install a single garage door to match the ones out front. If the laundry plan goes kaput, then nothing is changing as of now. There are two very large brick pillars that flank our current driveway. They will get knocked out and a fence will go up. This fence will connect the existing fence in the front and back yards.

As far as the front porch, it will be slightly larger than before but basically the same design. We will not be replacing the brick. Maybe down the road we might feel like re-laying it, but not now.

The walkway will extend from the corner of the driveway to the front door. The old brick walkway (going to the street) will be removed along with the brick mailbox. We will have a new brick mailbox built at the end of the new driveway. Ryan picked up the mailbox from Lowes yesterday, and I must admit it’s kind of fancy, who knew! (it doesn’t look very fancy in this stock photo though)
Obviously the new driveway will extend from the street to the garage, but we are also pouring concrete up the side of the new garage wall so there will be plenty of parking. The current flowerbed that’s along the front yard fence will remain, although we will probably plant new bushes.

Lastly is the brick. We think we have a match! Of course we won’t know how well it matches until it goes in. It’s the Glen-Gery City Line called “Canyon Blend”. It’s a smooth brick with dark variations. Below are the samples we had to choose from. “Canyon Blend” is the middle board.

Phew! It’s a lot to think about but I think it will be so nice when it’s finished. I hope the finished product looks as good in person as it does in my head.

Safety and Space
Has it really been over a year?? 2014 was pretty rough but we are finally back in the swing of things. The year ended (and 2015 began with) foundation repair that was supposed to take 4-6 weeks. After a few hiccups, slow workers, and revised plans, the project is finally complete 6 months later…i think (the contractor has yet to come get his final payment). In the process, our entire front yard was destroyed, including our brick patio, all landscaping, and grass including the property we own across the street.

…
.
…

Now that the basement has been dry-walled (still needs primer, paint, and trim) and the soil has been put back in order, we’ve decided to take on our next (and final) big project for this house, a garage addition. Since our property has been thoroughly destroyed, why stop now?
Background on our current driveway/garage: this house currently has a (comfortable in 1965) 2 car garage. Although it is ‘comfortable’ it’s very small compared to the garage we grew accustom to at our old house. Ryan’s large Sequoia and my 4 door sedan barely fit in the space together (let alone our bikes, lawn equipment, etc..). We never realized how big our old garage was until we moved into this house. We could probably live just fine with a small garage (or buy smaller cars), but the heart of the problem is safety. We live on a short dead end road with 8 houses, but we also live on a fairly traveled state road. The main road leads to the state forest and cars/trucks/motorcycles FLY through the curvy hills. Our biggest challenge is that our current driveway/garage is on this state road. Every day we are forced to blindly back onto traffic. We cross our fingers there is no vehicle flying down the road (usually at 50 miles an hour although the speed limit is only 30) ready to hit us. We hired the architect that designed our master bedroom to put together a possible plan to change the location of our driveway. He completed a study and it revealed we have approximately 3 seconds from the curve of the road to make it out of our driveway before a traveling car has the opportunity to hit us as we back out. Our architect also informed us we would need a variance from the city before we could even move forward with designing plans. With his help we filled out applications, hired land surveyors, and applied to the city for the possible variance. Over the summer he accompanied us to a hearing were they determined yes, we could move forward with our desire to move the driveway and repositioning it to the front of our house instead of the side. Little to our knowledge, we only had 1 year from the day we received the official approval to complete this project.
Below is the current setup of the garage so you can get a feel for the space:


Our architect drew up a plan that extended our garage 30 feet towards the front of the house. We ended up scaling it back to 28 feet. It will essentially be a big box (no attic) with two single garage doors, a man door on both sides, and lights/electrical. The front wall of our current garage will get knocked down (and supported by a LVL beam) and the space will open up to a 4 car garage.
Here are the site plans:

The garage doors will face the front of the house,creating a safer exit from our driveway. We pulled the trigger and our contractor broke ground last week. In under a week he got an excavator in, foundation footer poured, brick removed from the existing garage, and today the guys laid all the cinder block. By the end of the week we should be all framed up and hopefully under a roof!

This will hopefully be our last BIG project on this house. It’s going so much faster and smoother than the foundation, so we are off to a good start!!! I couldn’t be happier that we are (maybe?) back into the home-remodel groove. It’s been a rough year, but everything seems to be coming together. I’m especially happy to be back to blogging. It’s something I’ve enjoyed and definitely missed! I’ll be back with an update when we are under roof 🙂
*update* Here is an idea of what the house should look like once it’s compete:
Master Bathroom Reveal!
finished. complete. done. concluded. over. through. Whatever word you choose, it’s finally time for a formal reveal of the master bathroom at casa da bauer. It’s officially time to let her to walk down the runway, hopefully without tripping.
We designed the vanity with with the help of our local cabinet store, Nitro Carpet and Tile. The cabinets span 12 feet across the entire bathroom. They are made of solid maple with a linen (white) stain. The hutch was on my must have list since Ryan requested a television like we had in our first home. The hutch is 36″ wide, 8″ deep, and 60″ tall. Ryan added extra support for the TV mount and hardwired cable and electrical before we hung drywall. The wall scones are from the Halina Collection at Home Depot and the towel bar is the London Terrace towel bar (I splurged for the 8″ towel bar because I have a bad history with towel rings…they constantly fall off the wall!!!!! …at least for me).


Despite naysayers, we opted to go with a Carrara marble countertop. It was quite a fiasco. I put a deposit on a slap that perfectly matched our 12×12″ floor tile at a local store called Casto Tile. They decided to sell our piece to someone else then refused to give us our money back because they didn’t have enough money in their account (go figure). After a few calls to the credit card company, we got our refund and found a similar slab at Origins Granite. It’s not an exact match (the veining is a bit darker) but in the end, really?! ….I’ll be the only one who looks that closely. And our double bonus? We ended up saving $1,000 by going to the competitor! (note to all: ALWAYS put your deposit on a credit card!)

We opted to go with the rectangle under-mount sinks. Originally my plan was to go oval. I thought the round shape might break-up all the straight lines in the room, but at the request of Ryan we went the rectangle route (Gotta let him win one here and there). They are the Decolav brand from Home Depot. The faucet is the Victorian center-set chrome faucet from Overstock. It’s a single handle design (at the request of Ryan – he has more say than he thinks he does (wink, wink)). The faucet is actually the first thing I bought back in January/February 2013 when this whole remodel mess began. The reviews about installation were awful, but since I knew a plumber was going to install them I figured it didn’t really matter…and I was right, he had no problem (leave it to the pros!). We actually hired a plumber to do about $1,300 worth of work. We needed to move the plumbing for our sinks and add to the existing plumbing to accommodate the 3 separate shower heads in our massive 5×8 shower.


The glass doors are each 36″ wide and 80″ tall, spanning a 74″ opening. They came from another local company called The Glass Guyz (who were awesome, by the way!), out of Hurricane, WV. We tried to shop local, avoiding the big box stores as much as possible. The hinges and handles are also chrome. We splurged on the upgraded towel bar handle for $50 more per door.


All three shower heads are Delta brand, also in chrome. The center shower head is a handshower on a slide bar for easy cleaning or handicap accessibility if something tragic happens down the road….always thinking ahead!
We used 2×4″ Carrara marble in a subway pattern on the shower floor. At first we were concerned the floor might be slick, but there’s enough grout between those tiles to act as a natural anti-slip mat. We also carried those 2×4″ marble tiles to a chair rail on the shower walls. In an attempted to add a little contemporary flair to this mostly traditional bathroom, we laid the 9×24″ grey wall tile vertically. The tile itself is almost the exact opposite pattern of the Carrara marble. It’s a dark grey with light grey veins. Made by Crossville, it’s called General’s Grey. We order both the floor and wall tile online, both shipped without any problems!

Lastly, the watercloset. I won’t lie, it was my request. Having the pleasure to stay at several Ritz Carlton hotels as a youth, I was always fascinated with that private watercloset hidden behind a louver door. (I guess interior design has always been in my blood…ha!) Granted, I didn’t get a louvered door (another win for Ryan), but a fancy Kohler commode with crown molding from Ferguson’s is always a plus. We still have to replace the window sill and add casing around the window when the weather is warmer but if that’s the only thing incomplete on this 9 month renovation, I’ll take it!!!
Now for the side by sides of the before and afters from the same angle. (Find more on the befores here , here and here)

 So did we hit it? Did we create the timeless mater bath retreat/classic hotel feel that we were going for??! It’s insane to look back at the past year and the transformation our (not so new anymore) house has made! We plan to put the finishing touches on the bedroom and start the custom built closet system in the walk-in during the next few weeks….we’re moving at the pace of snails, I know.
Floors!
Yep, they’re in! Our twinkle toes are now touching new hardwoods and marble. I can officially say I won the battle-of-the-flooring. Ryan wanted carpet. I wanted hardwood. He likes a soft feeling under his toes, I like the easiest way to clean up dog vomit. Not that dog vomit happens a lot, but it does happen and it’s much easier to clean wood floor (in the dark, at 3am) then carpet. But anywhoo… This is what we were working with in the hall/bedroom.
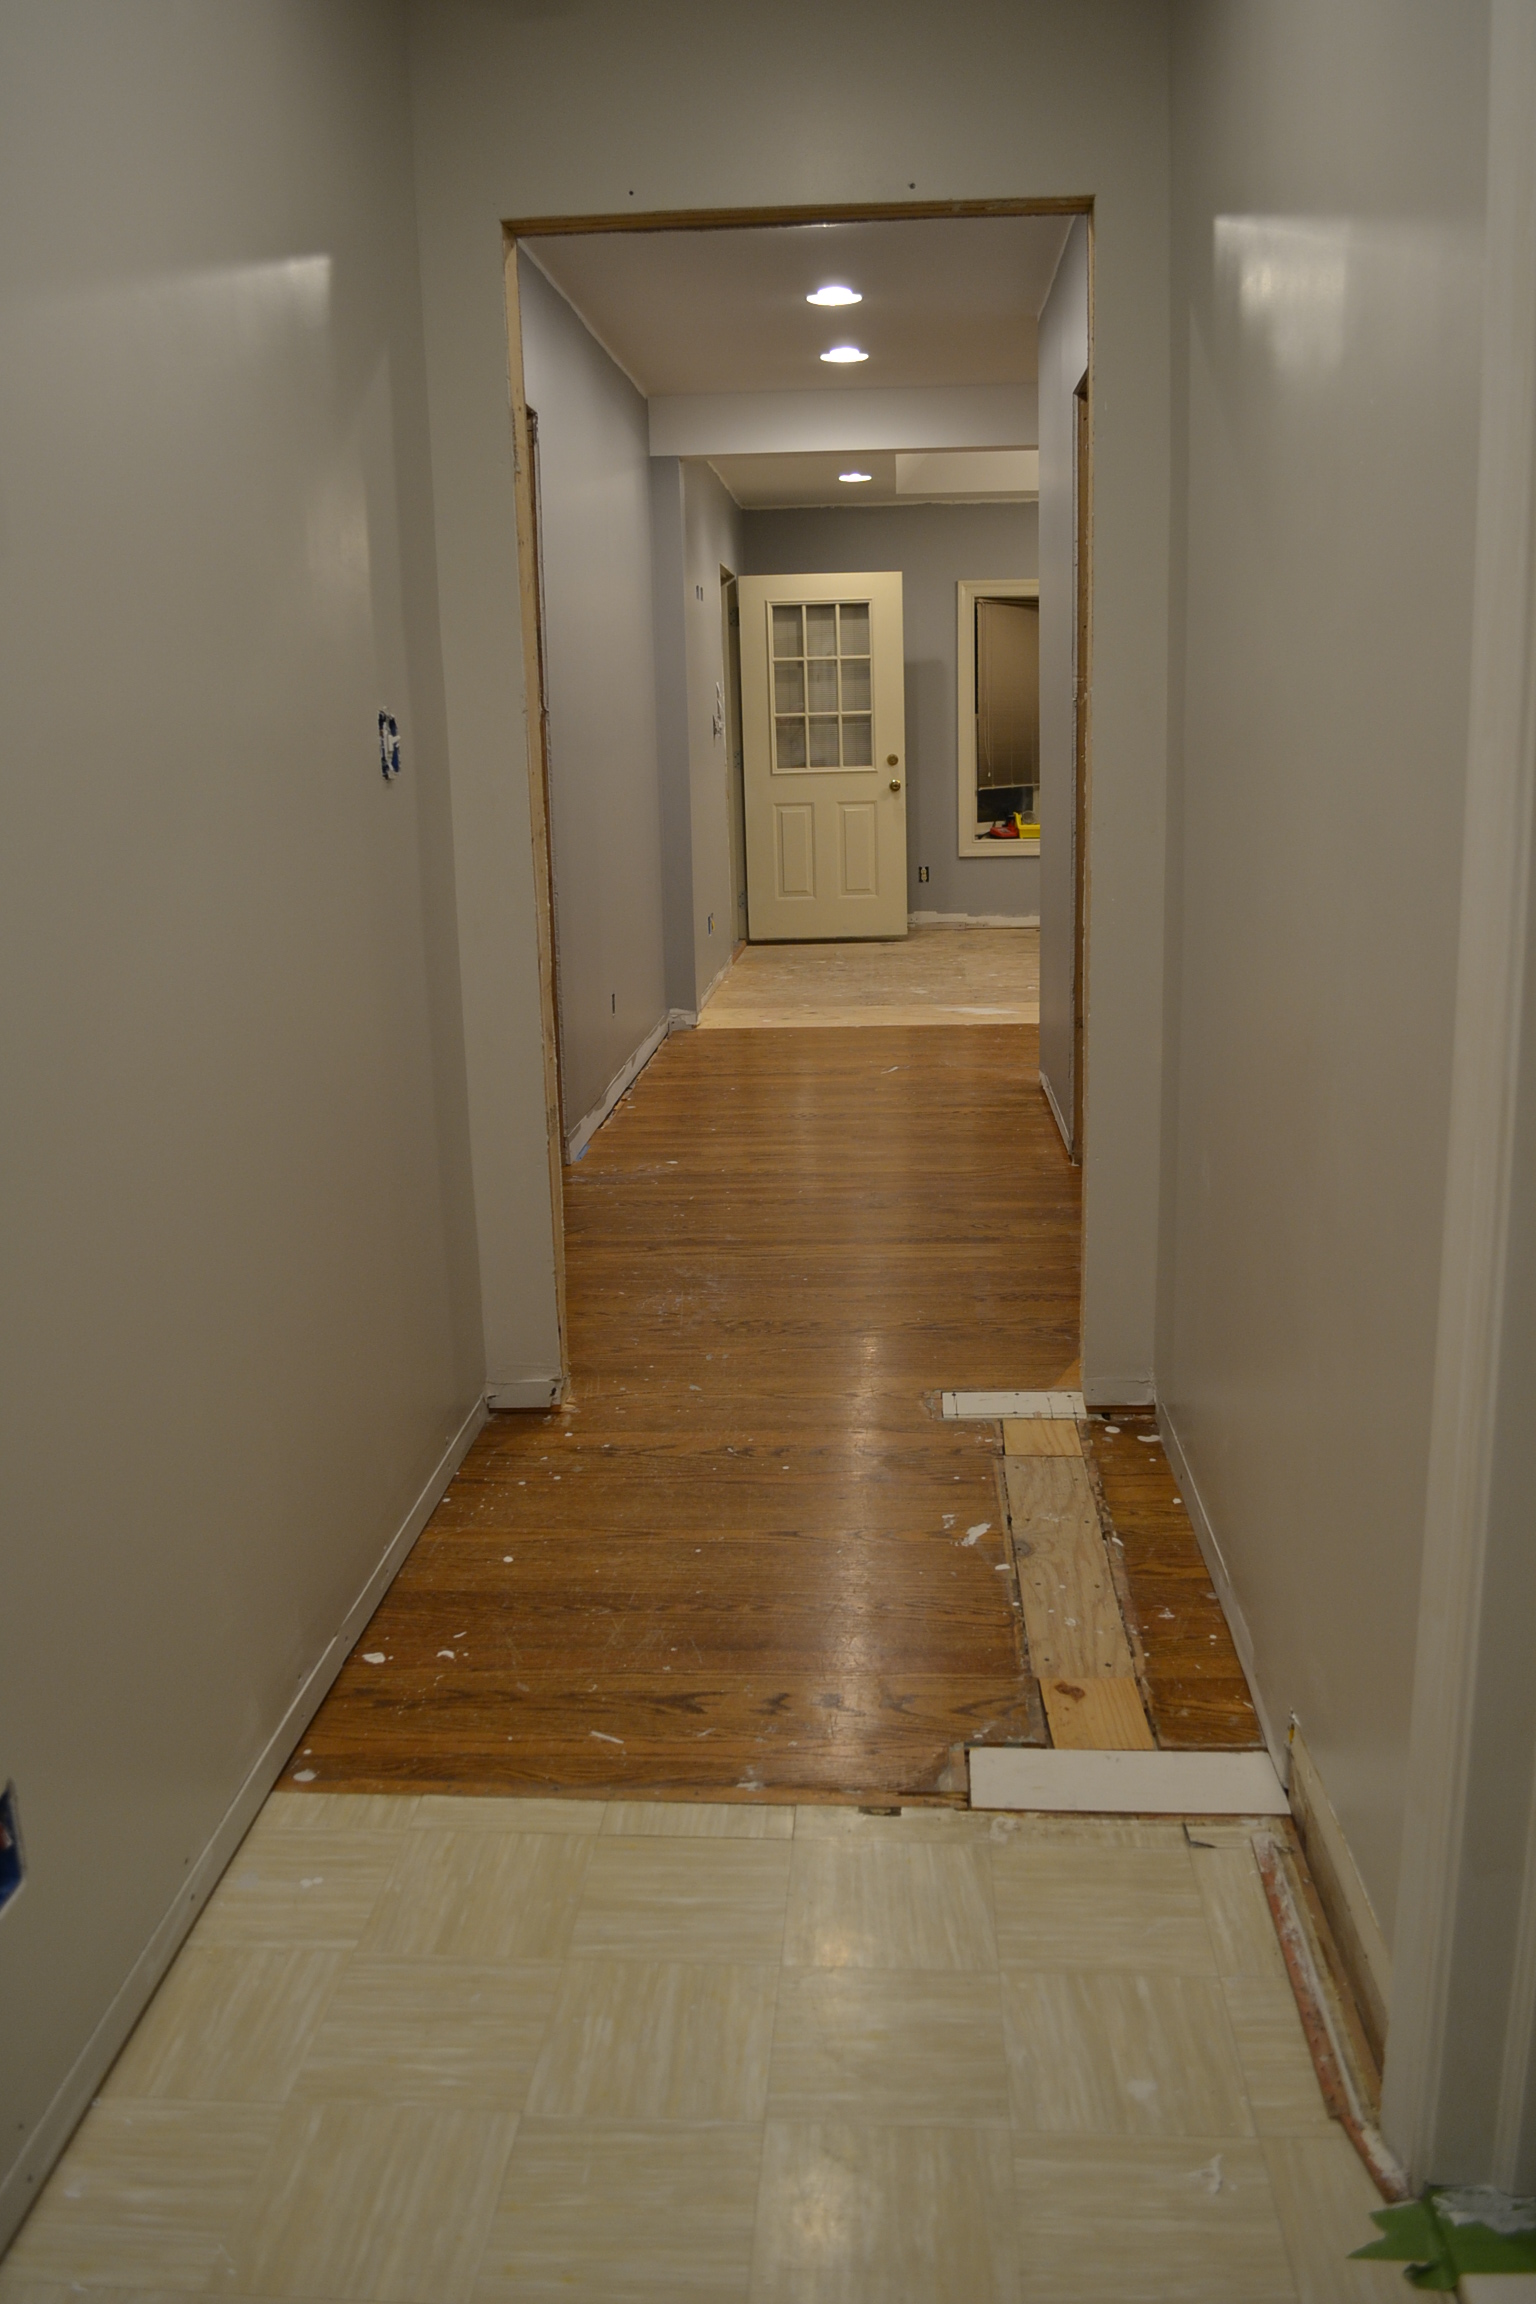
Half of the master contained hardwood flooring that I believe was original to the house. The other half was carpet with sub-floor beneath. Why half and half? Remember that brick wall we torn out? That was an addition by the previous owners, hence no wood floor in that space.


I’d like to think I am a very gracious winner. Since I won the battle-of-the-floors Ryan got to choose the hardwood. We headed to Lumber Liquidators just to “look” at their inventory, but of course made a purchase that same day. Ryan chose Acacia. And here’s the reason: It’s known for strikingly dynamic grain and knots (which he loved) and it’s one of the hardest woods in the world (which I loved), so it was good for dogs. Win-win situation. We loaded (and unloaded) 21, eighty six pound boxes of this stuff. Lift with your legs, not your back.

The floor was required to rest for 2 weeks in the house. The wood has to acclimate to the humidity, temperature, etc…in your home. We really thought deeply about DIYing the floors and installing them ourselves but in the end we didn’t want our first hardwood installation to be a 450 square foot test-zone. So….we hired out. The contractors made our day when we were told they could install the new floors right over the old ones….hurray! We had to make a few patches where old walls use to be (especially in the closet) and we were good to go.


The guys were super-fast. They completed the job in a day and a half. Ryan stayed home with them while I went to work. Throughout the first day he teased me with these iphone photos….


When I came home from work on the second install day I was greeted by these beauties in our master bedroom

Hello beautiful Acacia! And here’s the walk-in closet:


We didn’t stand and stare too long. Shortly after our gaze-fest was over we covered them back up. I wanted to keep them protected during the bathroom marble install…which we did DIY. So without a breather we went right back into it. Ryan mixed the mortar and laid the 12×12 tiles while I ran the tile saw.

We’ve never worked with Carrera Marble, but it really wasn’t any different than the ceramic tile we’ve laid previously….minus the weight and cost. I began to get a little nervous when the marble started to turn dark grey. Ok, not a little nervous…a lot nervous. The reason I picked this certain “Bianca” marble was because of how white it was and how grey the veins were…eek! After a little googling, I found out this porous stone soaks up all the moisture in the mortar when it’s laid but will eventually dry out. So we turned on a few fans to help the process go a little faster. Issue resolved.


Since I share the good and the bad, I’ll admit to one little snafu….
When we first started laying tiles we kept pulling from the same box…BIG MISTAKE. We were supposed to randomly pull from all the boxes (which we knew) so the tiles are laid in a random pattern. It just so happened that that first box contained pieces that were more “white” than “veiny”. We noticed this issue fairly soon into the process and immediate started rotating tile. We lived with the floor for a few days, but Ryan decided those first 7 tiles needed to go. It was like staring at a bunch of misfits.

Ryan and Carpenter Al took hammers to those beautiful marble tiles. They did a smash and grab kind of job. The marble won’t pop out in whole pieces so crushing is the only option. In 20 minutes, all 7 were out and ready to be replaced. (For the record this was not at my request. This was all Ryan. He said something about me complaining five years down the road and to him this was the easier option… I have no idea what he is talking about). Luckily, we had plenty of leftover tiles so it didn’t really cost us extra. (notice how those 7 tiles are way darker from the rest of the floor? that’s the moisture I was referring to)

Once everything was completely dry (about a week) it was time to grout and seal. I used Mapei brand unsanded grout from Lowes in ‘warm grey’.

To be honest, I’m kind of disappointment in the grout. It looks nothing like the color on the bag. When it dried it was almost white, not the warm gray the bag advertised. We are definitely going to use a different color on the shower walls. It was dark when wet which led me to believe it would dry a warm grey.

\
After a few days of dry time, it was finally time to seal-her-up. The online reviews said to use standard stone sealer, but I decided to invest in the more expensive “DuPont Premium Stone Sealer”. More expensive = better, right?! Not sure if that theory will apply to our marble, but we’ve put so much hard-earned dinero into this project, why skimp on $40?

I don’t have any pictures of the sealing process because I was by myself, but It. Took. Forever. I think I started at 6pm and finished around 930pm. I did two coats and applied it with a roller, per printed directions. It wasn’t hard, just time consuming. And I was trying my best not to ‘seal myself into a corner’.

It’s amazing a). how long this project is taking b). how much I love pretty floors and c). how much toilets cost. (Yep, commode was picked up from Ferguson’s today!)
Maybe one day in the near future I’ll break out the Nikon again and stop taking iPhone photos…sorry they are all so grainy! oops. #blogger_fail.
Getting Schluter’d.
There’s this whole new system in waterproofing bathrooms now-a-days…It’s called the Schluter System. Our carpenter Al, schooled us on this nifty new process. Back in the good old days (like 7 years ago) when we did our first master bath, it was all plastic sheeting, cement boards, etc… Now it involves rolls of bright orange plastic called Ditra and it’s applied with mortar. According to the website it’s a polyethylene membrane.

This fancy stuff is for sale at Lowes and Home Depot, but we ended up getting ours from the local flooring store, Nitro Carpet and Tile. It’s supposedly the state-of-the art water proofing system. It’s light and airy…reminds me of a breakfast waffle (but not near as tasty).
Before the Ditra could be installed we had to remove the old (original hardwood floor). We then screwed in two layers of plywood to get the floor back up to the height we needed.


We did all the plywood ourselves, but since we had never worked with Ditra, we let Carpenter Al show us the way…


It looked fairly easy and I have no doubt that we will do it ourselves if when we re-do another bathroom. Here’s the gist of it: Mix motar, plop mortar on plywood, spread evenly with flat trowel, lay Ditra on top of mortar. Boom. Oh yeah, he smoothed over the entire orange surface with a piece of 2×4 so it was level. Boom.
Now for waterproofing the shower, we were supposed to use Kerdi panels on the walls, also a part of the Schluter system. Of course the ceramic wall tile we bought was not recommended for use on Kerdi panels. So we went all old school in the shower and used good ole Durock cement board and mortar.
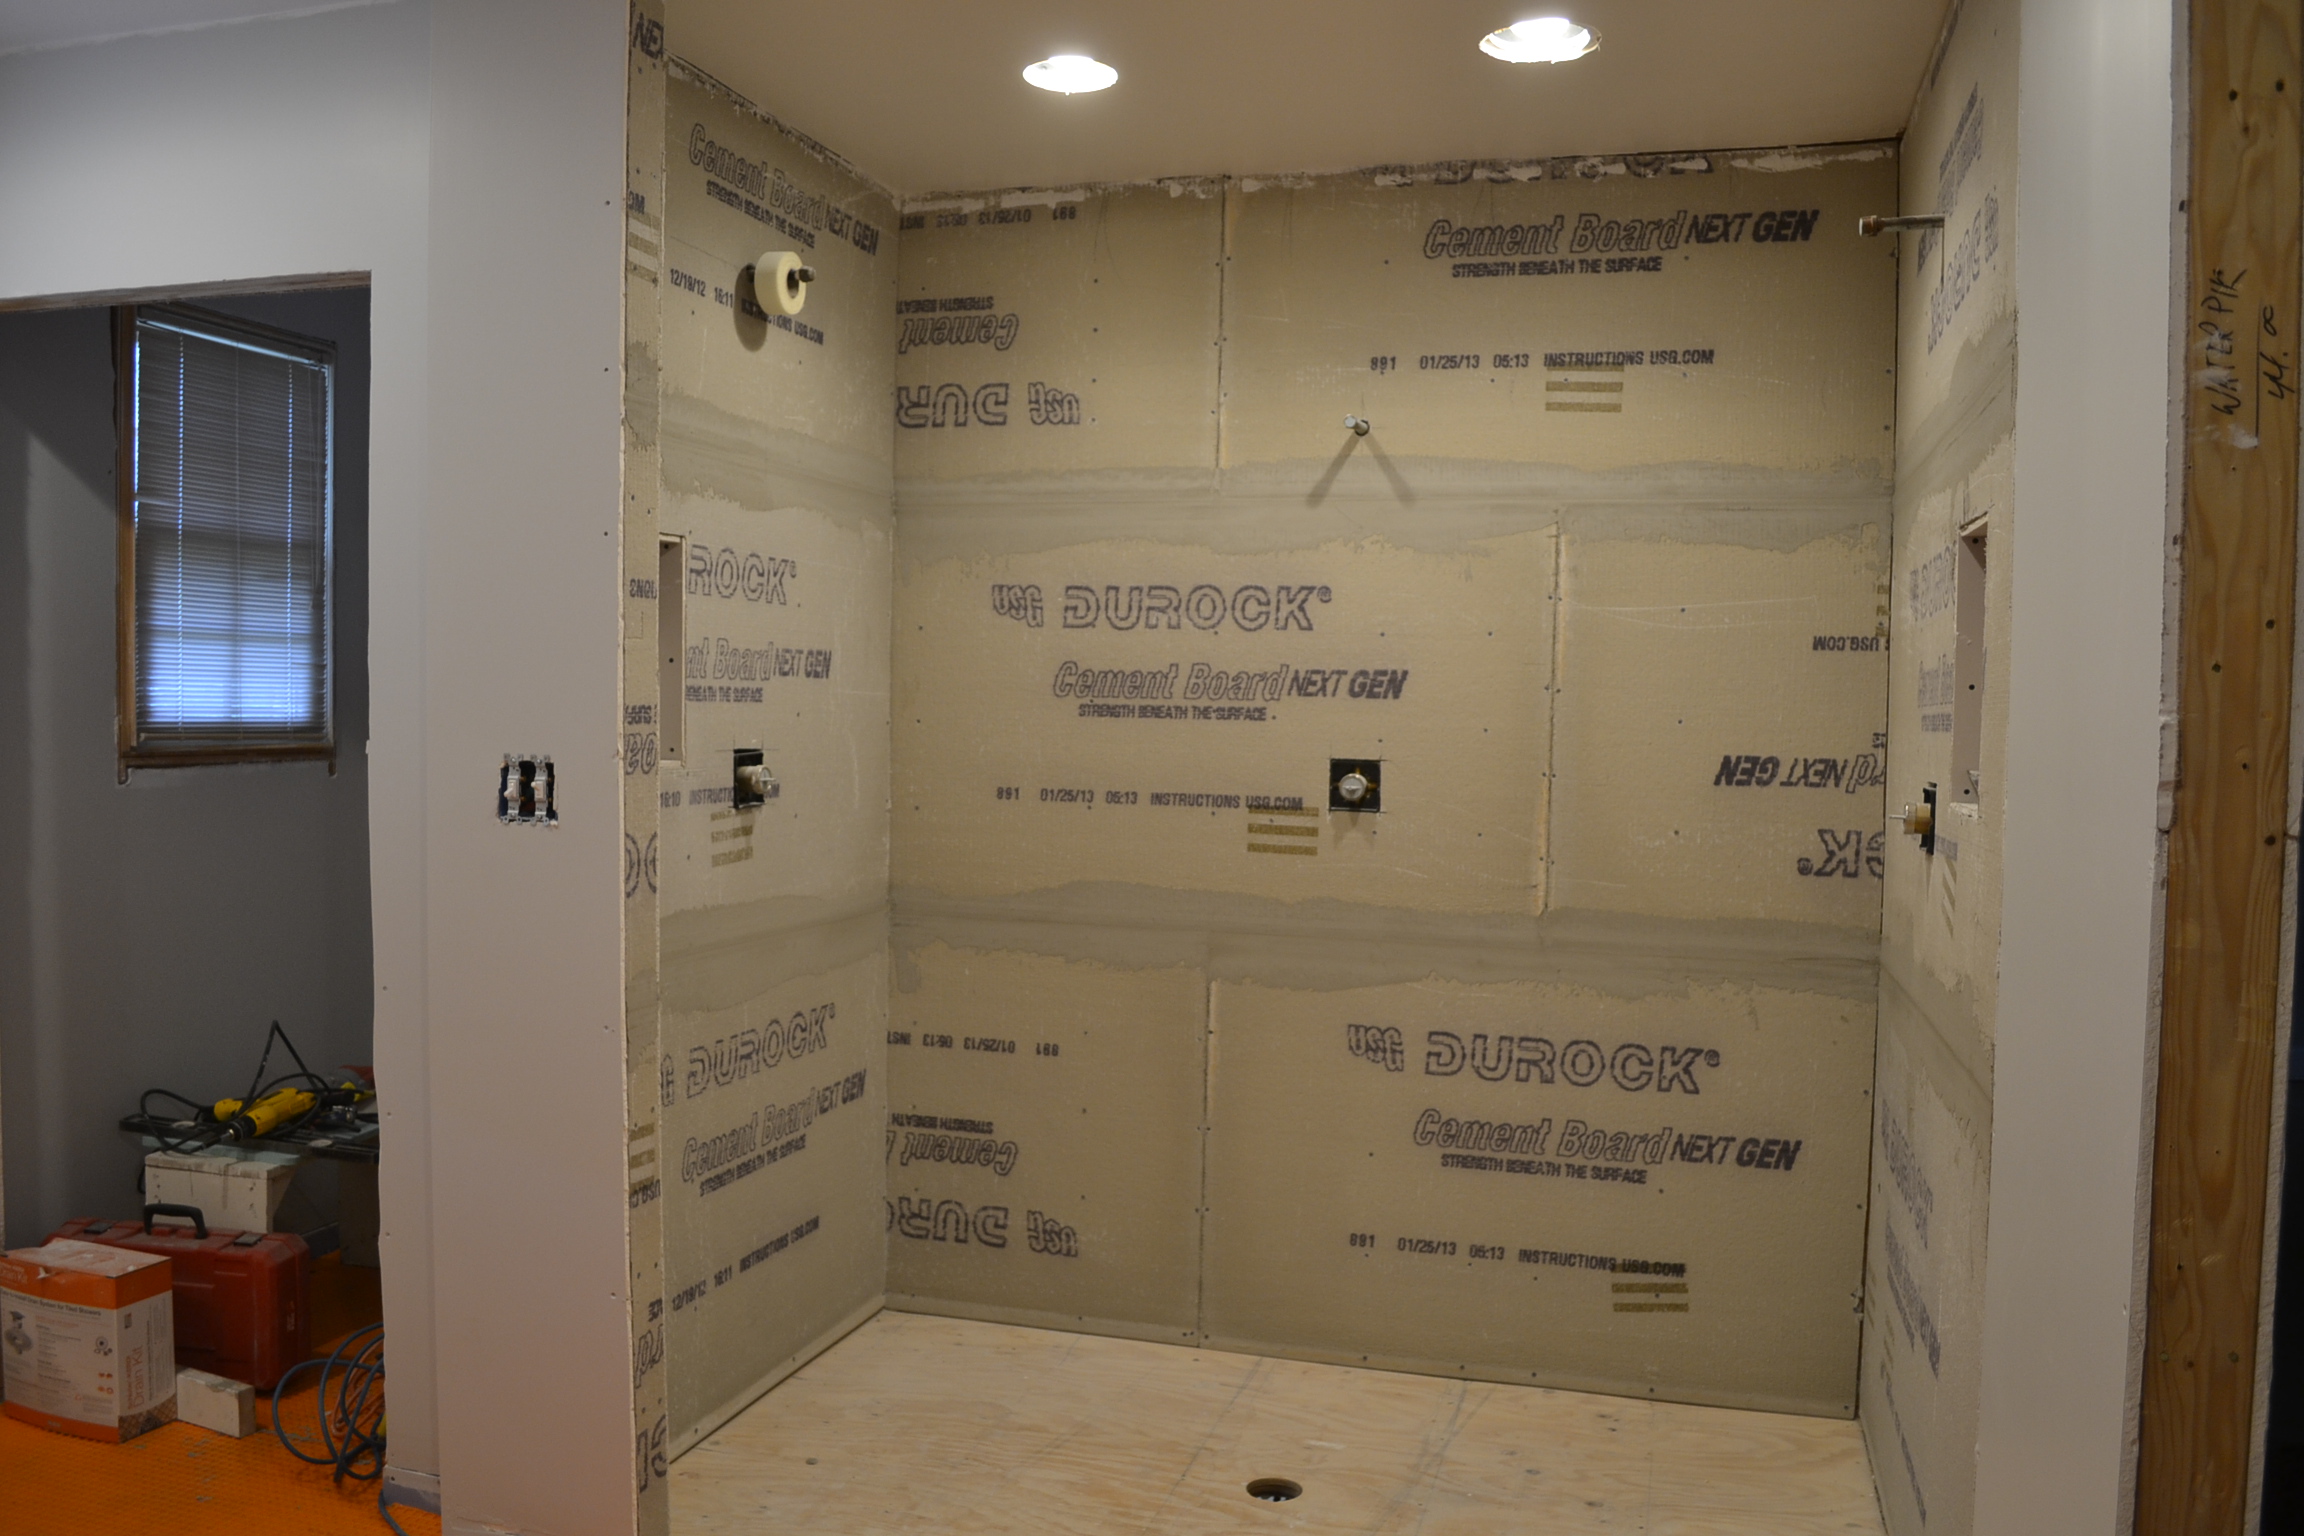

To waterproof the Durock, we used a product recommended by my hair stylist Esta (who was doing a bath remodel at the same time….she’s finished though, go figure). It was called RedGard. It was only available at the Home Depot and it was a little pricey, but it was a fabulous and easy process.

Supplies needed: Paint tray and liner, unused 3/4″ nap roller, and old paint brush….that’s it! It was just like painting a wall, except it was really thick. You apply the pink goop with a roller or spackle knife and that’s it.


The trick to the RedGard is to make sure you are getting it on the wall thick enough. I can’t remember how thick it was supposed to be but it says on the bucket. It took about 3 gallons to waterproof our 5×8 shower. It says you can use this anywhere you want to keep water out…basement walls, etc…
Once the waterproofing was completely dry we could move on to the shower floor. I’ve traveled an unusual amount this summer. There were several weekends I left Ryan and Al to do the dirty work while I frolicked in far-away cities with sorority sisters. One of their projects while I was away included the installation of the shower pan, It was also part of this Schluter System….it was called the Kerdi Shower Kit.

The pan itself was a styrofoam-like material. It wasn’t large enough for our 5×8 shower so they ‘packed’ cement around the outside edges, making sure it sloped down towards the pan/drain. I checked all my photos…nope, not a single picture of this. Use your imagination….or google it.
In comparison, we really liked working with the Schluter System in the bathroom. It seems like a fool-proof way to waterproof any bathroom. We’ll let you know after we take our first shower…but we would need tile in the shower before that could happen! One day at a time…..right now we are focusing on working the reno a few days a week and enjoying the boat and the golf course all the other days. Summer will be over before we know it, we need to enjoy some of it………………………………………..
Master Renovation Update
For a renovation that was scheduled to last 3 months, we are now approaching the 6 month mark. Yikes! What can I say we have lives and jobs and sometimes things don’t go exactly as planned. That being said. I have an update to share! We have been moving quite quickly during these last few steps and I can finally see light at the end of the renovation tunnel.
Back in April we finished up with the drywall and had started mudding. As of now, we are completely sanded, primed, and dare I say it, PAINTED!!

I forgot to take pictures on the Nikon but luckily I take tons of shots on my iPhone that we periodically send to family.

The biggest decision in painting the master bedroom was h0w to paint around the load bearing beam we installed. We decided to paint it white so that it could (hopefully) blend in with the ceiling. I grey I chose (on a whim when I was at The Home Depot) is slightly darker than what I had hoped for so she’ll most likely get another paint job in a lighter shade.


One of the biggest accomplishments (in my mind) was getting the foyer area mudded, sanded, primed, and painted….and plastic removed. This area took a very long time because we kept forgetting about it. We would work in the bedroom and bathroom and completely forget there was another area that needed attention. So FINALLY, we fit the foyer into our plans and I painted it to match the existing color.


It feels good to finally have a sense of accomplishment in this renovation, even if we still need to add a door to the foyer coat closet, some floor trim and crown (oops!). Before the paint even dried, I immediately torn the plastic off the living room wall and moved the furniture back into the space. The sideboard and decorations all sat covered in our living room for 5 months. It felt like Christmas morning when I uncovered them!

So….one thing at a time. …and now that the bedroom is nearing completion it’s time to jump start the master bathroom into gear..that space is still an open area waiting to be schluter’d (as in the Kerdi Schulter System- how we plan to lay the tile), tiled, grouted, and everything else….
DIY Hidden Tab Curtains
The sunroom in our new home is directly off our kitchen and has an access door to our master bedroom. Since this area is so close to our master bedroom, it has become the ultimate dumping ground for everything master-bedroom-renovation-related. At any one time you will see probably 8 pairs of work gloves, three measuring tapes, carpenter pencils, and a pile of disposable masks on top of various power tools, extension cords, oh, and don’t forget the three inches of dust sprinkled on top. It’s quite the couture look, let me tell you.
So, as part of my “let’s clean up the clutter” rampage I started to clean up the clutter. I found an empty bucket to dump all the work gloves, masks, and tape measures in. Power tools went back into the actual work area and extensions cords got wound back up. I mopped the floor and fluffed the cushions but didn’t bother to dust….at this point in the remodel process it’s really not worth the time.


The wicker furniture was left to us by Ryan’s parents. It was originally white.
 I got on a painting kick when we first moved in and spray painted the entire wicker set brown (original house tour here). When we were in Florida (mentioned here) we found a wicker trunk at a consignment store for $65. It’s in really good condition and once it gets painted to match it will be a handy place to store my outdoor cushions. Awhile back I picked up a blue and white ikat rug at Homegoods but besides that I haven’t really done anything with the space nor had I planned on doing anything anytime soon…..but then I discovered the perfect fabric….
On a random trip to Wally World I passed the “craft” section (by far the most pitiful excuse for a craft section) and a fabric caught my eye. Hesitantly, I walked over to it, opened the bolt and was in love. It was blue, grey, and white ikat, similar to my Homegoods rug… I never expected to see such a contemporary pattern a Walmart (Walmart fabric seems to be reserved for camo, cartoon, and anything tacky). Then comes the typical Walmart experience: I rang a bell, waited 5 minutes, rang the bell again, then went to another section, found an employee who called another employee and i finally got one yard of fabric cut with the hopes to make an awesome pillow for my sunroom.

When i got home with the fabric I discovered that is coordinated perfectly with my Homegoods ikat rug. It’s almost the exact reverse of the rug which is a blue background and white pattern. I went back the next day and bought an additional 6 yards because this fabric deserved to be more than just a pillow. Hence, how I ended up DIY’ing some hidden tab curtains for the sunroom. Oh, and as if there couldn’t be anything better…I forgot to mention the fabric was $1.50 a yard??! Crazy cheap. Like $9 for an entire pair of curtains cheap…Ikea can’t even compete with that.
Ryan golfs every Sunday morning so I had a few hours to myself to get get these babies made. I surfed Pinterest and found Cathy from Fiscally Chic’s tutorial on hidden tab curtains and got to work. (Oh yeah. Ryan shot a 72, I know you were wondering…).

Cathy’s tutorial was great but I altered it slightly by not using a sewing machine. My sewing machine/craft room is busy being buried by our old bathroom cabinets, bedroom furniture, and various other items we need to store during the master bedroom remodel, so I opted to use “heat and bond”hem tape where the only equipment required is a hot iron.

I went with the hidden tab because I like the clean look of the casual pleats. Pinch pleats are really too formal for the room and I can’t stand a rod-pocket drape. Here is a great guide to different types of window treatments from the blog As the Curtain Hangs.

And one more tidbit on curtains and drapes…they are not the same. Curtains are light and airy and often sheer, whereas draperies are lined and more formal…so in my case, I am making curtains. Van Wilder would say “write that down.”
After a quick swiffer to the floor, I laid down my 6 yards of fabric and cut it in half. In hindsight, I should have looked at the pattern first to make sure both panels lined up, but the fabric gods were looking after me and all was well.

Next I set up an ironing station on the floor by laying down some old towels and got to work. My favorite assistant, Ninka, watched diligently as I ironed my fabric into curtains.

The first panel took me around 2 hours to create but the second one breezed by in under an hour. Its funny how it always goes faster the second time around. If you are interested in an actual tutorial on how to make these hidden tab curtains, follow the link above to Cathy’s blog or you can always google search it on your own. I’m sure there are thousands of them.
Before I could hang my freshly pressed curtains I had to hang my rod (this was the first time I ever hung one completely by myself= proud). I picked one up at Homegoods for about $25 bucks. Unfortunately this room has an awkward soffit on the left side of the window so I was forced to hang the brackets directly on the window casing. It’s not my ideal place to hang a rod (a few inches from the ceiling is ideal), but desperate times called for desperate measures.


When it’s all said and done I think it looks pretty darn good! The curtains move focus from that weird soffit and off-centered windows and give a punch of color that this off-white room needed. I added the ikat rug beneath the trunk and called it a day (for now). Color me happy I love the new look of the room.


The casual pleat of the curtain adds enough interest but nothing over the top. I can’t wait to accessorize the space with a lamp and some tchotchke’s once the master bedroom renovation is complete. There’s no point in doing that now since the dust and tools are guaranteed to make their way back in before long. Speaking of which we are moving along on the master, but it’s going slowly. Hopefully I will have an update on that space soon.
Drywall and Mud and Electric, Oh My
It’s been a redonkulous-ly (that’s a word- it’s totally in urban dictionary) long time since our last master bedroom update…42 days to be exact. In 42 days we having finished framing:

…built a temporary wall and installed a load bearing beam (in three pieces):


…hung some drywall:


…went on a 10 day vacation to Florida:


…tapped and mudded:

…and added tons of can lights and wires:


That pretty much sums up the last 42 days. This renovation is taking a wee bit longer than planned, but then again don’t they all? Now that it’s warming up here in West Virginia we’ll be itching to get out on the boat any day…so needless to say we better start kicking it into gear!!
On a side note, this is our first spring at the new house. I went out back today to play with the dogs and discovered this:

I always wanted a spring flowering tree at our first house, but never got around to planting one. WELL I’LL BE! I have one two here and I didn’t even have to plant them! Super psyched. Oh, and while I was out back admiring my flowering trees I was able to capture both pups in one shot…a major rarity.

Big ol grumps….probably a side effect from all the deer poo they’ve been eating….or maybe they are just ready for all this renovation to be over too!
Surrounded by Studs
Not only am I referring to Ryan and all his friends that have helped in this remodel process, but I am also referring to the framing that’s been happening in Casa de Bauer! We are (almost) completely framed in the master, walk-in closet, and bathroom. But before we got there, we had to knock out the walls so we could build new ones….makes sense, right? Ryan and I worked carefully around the electric to dismember what was left of the original six closets and hallways.

I kept joking “it’s a good thing I’ve had a tetanus shot” because those 2×4’s were covered in countless rusty nails. Miraculously( Michelle = clumsy) I haven’t been stuck…but never say never! At first we tried to do the ‘green thing’ and remove the studs carefully so we could re-use the boards, but we decided we were spinning our wheels and wasting too much time just pulling out nails. On the plus side, we did manage to save a good amount of studs before we started scraping them.

When it was all said and done, we were left with a large empty space.


While removing the carpet we uncovered old white (what looks to be asbestos) floor tile from 1960. Because we plan to lay carpet in this area we are not concerned the tile may be asbestos. It’s when you want to remove/break up the tile, that you have a problem. We are just going to cover it up, so bada bing, bada boom!
Over the past few days we have been slowly chipping away at the brick load-bearing brick wall (mentioned here) in the existing master. We were offered help by two of our friends, so we of course we accepted.

David swung the hammer while Brian shoveled the heavy debris into the wheel barrow.


We are lucky enough to have a dumping area on our property so we didn’t have to pay for brick removal. The wall couldn’t be demo’d (is that a word?) in one night so Michelle was nominated to finish the job while Ryan began framing. I don’t think Ryan thought I had it in me, but I did pretty damn good if I do say myself! I removed the rest of the brick and moisture barrier on the right side. I was told to leave on the left side of the wall because that is technically the original exterior corner of the house and the brick was stacked differently.

If I don’t get ‘guns’ (aka arm muscles) from swinging a 16 lbs sledge hammer into brick, I don’t know how I will.
But anywho, while I worked at growing my biceps, Ryan and Al (the carpenter we hired to help us post-demo) got into a groove framing out the space. In less than a Saturday afternoon the whole room was almost completely framed out…woohoo!


*Excitedly* I announce, we now have a framed hallway, walk-in closet, and bathroom.. I won’t lie, I may have let out a squeal or two in excitement. This renovation is finally starting to take shape. We can totally see a future in this space – laying in bed on a lazy Sunday morning, putting away laundry in our large walk-in closet, getting ready for a black tie event…and no, there isn’t a baby cradle.
Next on the list: installing the load bearing beam and finishing up some little electric! You may have noticed our electrician (electric is something these DIYer’s don’t touch) has already had his hand in this space. His name is Bob and he thinks Michelle is crazy. I don’t think he has officially said the word, but I think “overkill” is what comes to mind every time he walks in our house. In my defense, I just want to cover all bases…Hopefully wiring will be finished sooner than later….his hourly rate is starting to add up!
Crouching Homeowner, Hidden Beam
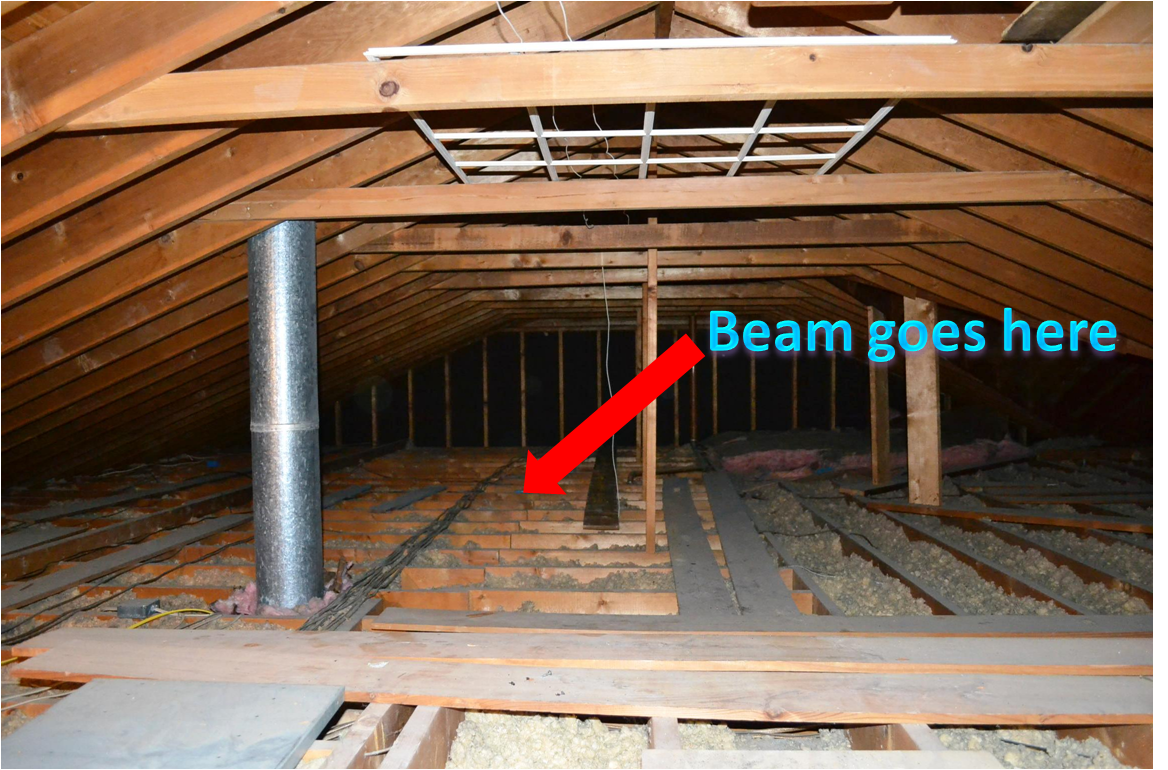
…As opposed to Crouching Tiger, Hidden Dragon….that’s what it felt like after being hunched over for two and half hours in our attic tonight.

Last week he had the architect come back by to assess the “situation” in the Master Bedroom after demo (found here). He suggested installing a 26 foot beam in the attic for added support where we are removing interior walls. After picking up a butt load of lumber and twice as many brackets at Lowes, we were ready to start the next step of the Master Bedroom renovation…p.s. Lowes in Cross Lanes was cheaper than the Lowes in Charleston, go figure.

Ryan bought two 16 foot 10×2’s and two 10 foot 10×2’s. The goal was to double up the boards to create a support beam for the joists in the attic. He cut one and half feet off the two ten foot boards with the circular saw. We alternated the pieces by length and nailed it all together to create a glorious albeit extremely heavy 25.5′ beam.


Nailing both 2×10’s together took a little lot of muscle work. I wore out quickly so Ryan had to take over my half (ok, mine was more like a third, not a half…and he still had to take over- apparently I’m a weakling when it comes to 3″ nails and a hammer).

When it was all nailed together we realized we were stuck with a 25.5 foot, 4 inch thick HEAVY beam that needed to be moved to the other side of the attic….and there was only two of us.
Ryan put the back half of the beam on an old skate board he found in the attic with hopes we could slide the beam to where we needed it to go. Michelle took it one step further and put a found 3 foot piece of PVC pipe under the front part of the beam…whala! It was perfect. Our almost 26 foot beam carefully rolled across the entire attic ceiling until it reached it’s home. Obviously I don’t have pictures of this since it was just the two of us, but picture crouching thirty-something year olds, a$$’s in the air and a few foul words thrown back and forth…

We carefully hoisted the beam into place (trying to avoid falling through the ceiling) on top of the joists and flipped it into place. Ryan secured the beam with metal brackets. It took 10 nails a bracket…times 35 brackets. He was able to complete 17 brackets before his back went out (unfortunately this not abnormal). I fed him a cocktail of 2 Advil and 1 Alieve to relieve the pain. If all goes as planned we will be able to finish the remaining brackets tomorrow. I tried my best at throwing nails into those brackets, but I exerted all my energy pounding those 3″ nails into the beam. I should be of better use for the brackets tomorrow.
Plaster + Demo = Lots of (Heavy)Trash
Before we started demo in the master area Ryan called several of his buddies in hopes they might want to help. Amazingly three of them came over with bells and whistles. I think the word “demo” for guys is like “shopping” to girls…just sayin’.
The first step before destruction was removing all the doors, door jams, and trim. The trim included window/ door casing, baseboard, and crown…which we found out we have tons of…literally tons. The guys carefully removed each piece and did their best not to break or damage the wood. We piled all the trim in the work area of our basement. Our goal was to save as much trim as possible so we can reuse it once we have the new walls built.


We thought removing the trim would take five minutes. Let’s try like 2 hours. Seriously?! Talk about taking the wind out your sail. I ran to get the guys some lunch and when I returned we were finally ready to start knocking down walls. Demo started in the easiest area…a 1990’s closet addition. The dry wall peeled off fairly easily compared to the rest of the plaster walls. Neither of us had really worked with plaster walls before and quickly learned it’s not a walk in the park. It is so heavy and when you hit it with the sledge hammer it crumbles apart, causing lots of dust and a messy/back breaking removal process.


Next up was the wall between my closet and the butler pantry in the adjacent hallway. Our Friend Ryan R. worked diligently to take this one out, and in no time he was able to see Ryan B. on the other side of the wall.

The guys kept swinging away as I snapped pictures and before we knew it we filled our first truck load of debris in about an hour. At this point several of the guys had to head home to their wives, kids, and their own projects but Ryan and Ryan kept working and went to dump the truck.

While the boys were gone (for what felt like several hours) I continued to pound at the plaster. The dogs continued to hide in fear of all the loud noise. I only discovered two unexpected surprises inside those walls. Two venting tubes that run from the basement to the attic. Luckily it won’t be a huge issue. We can work around the big vent by boxing it in with drywall (it is located in the closet) and the smaller second one can easily be moved to another wall.
The most aggravating area to demo was the hall between the ante room and the master area. This hall has four closets which means the plaster had to come off not only the outside of the walls, but the inside of all the closets as well. To state the obvious: we worked very careful around the electrical and plumbing.


The most intimidating portion of this whole remodel is this load bearing brick wall. When the house was originally built this area was a sunroom/screened-in-porch. In the 1990’s the porch was converted to interior space and became part of the master bedroom. They dry-walled on top of the brick, built some walls, and installed a window….hence why we have a load bearing brick wall inside out master bedroom.

We tried our best to bag the plaster as we went so we didn’t overwhelm ourselves at the end of the day(s). We also invested an air purifier and plastic sheeting. The sheeting is tacked and taped to all the doorways in the foyer area. Our goal is to keep the dust to a minimum in the rest of the house. While we still have dust everywhere, I can only imagine what it would like like if we skipped this step in the process.


The removal of the vanity from the dressing room went fairly smoothly. Ryan pried at the tiled countertop in several places then ‘pop’, off it came. He removed one of the sinks before hand, but the caulk around them was just ridiculous, so the second sink remained in tact and went down with the ship. We had hoped to donate them both to Habitat for Humanity, but some things are better left for the trash. We unscrewed the cabinets and they were also moved to the basement. I plan to refinish and reuse these cabinets in my basement craft room. Luckily the mirror came down in one piece (score!)…I had disaster written all over that one, sorry babe!


Naturally, the next step was to hammer out the shower tile. You gotta love the sound of tile falling off the wall and hitting the floor in pieces.


And then we did the same to the other side of the shower…still gaining joy from the breaking sound when the tile hit the floor.

I’ve estimated that we’ve used somewhere around 125 contractor bags so far in our demo. Its unfortunate that plaster weighs so much. We can only fill each contractor bag about half full…which seems like a complete waste of expensive trash bags if you ask me. Someone (maybe me?!) should invent “half trash bags”. If half-sized trash bags existed I wouldn’t feel like I’m wasting so many bags! Maybe they already exist and I just don’t know about them…

The other day Ryan removed the commode and the wall tile in the old bath. We plan to build a wall for the shower and turn this little area into a water closet . I was amazed how the tile just fell off the wall with a little tug of the crow bar….complete 180 of the experience we had at our first house when we remodeled our guest bath.

It case you couldn’t follow what we are doing in the mess of photos above, here is the demo plan and the ‘before’ and ‘progress’ side-by-sides:


With the plaster down we finally have a realistic look at what we’re working with. We decided to call architect Aric Margolis back to the house and have him check the bones, just to be on the safe side. He informed us the wall we are removing in the hall will need extra support in the attic. We have to add a 26′ foot beam, but luckily it will only be visible in the attic and wont affect the room visually (unlike the load bearing brick wall which will be replaced with a visible beam the length of the room). Once Ryan gets the attic beam in place we are safe to start knocking out the studs and begin building new walls. ….Just another day in the Bauer house.
Before there was Demo….
It’s been ten days since we began demo on our master bedroom (first mentioned here). The plaster part of the demo is 90% complete. All that’s really left is the removal of the brick load bearing wall and knocking out the existing studs.. But before I reveal the awful disaster zone we currently call home, I’ll show you what it looked like before destruction….also know as B.D. (not really).
The floor plan looked something like this:

I took these before pictures the night before we began demo so half our stuff was already moved (like our clothes) into a spare bedroom. So….these are ‘sorta what our bedroom liked like before’ before photos.
Bedroom:


Dressing room:

Dressing room/vanity/bath (behind the door):


Not-so master bath:


Michelle’s closet (notice the “One Shoe Can Change Your Life” plaque? It found a new (temporary home):

Hall to Master (3 closets in this area!):


Ante room/wasted “hall” space outside 2 of the guest rooms:


Foyer/Hallways to the bedrooms:


Unfortunately(?) our house looks nothing like this anymore. Did you ever see the Jennifer Lopez and Ben Affleck movie “Gigli”? Yeah, me neither, but I suspect our house is a bigger disaster than the movie.
We moved our bed, dressers, tv, etc…into a guest room down the hall (aka Heather’s room), which is fortunately a very large room. Our goal is to only live in this awkward state for the next 2 months….wish us luck on that one!
Gettin’ Down ‘n Dusty
48 hours and six closets ago we started a project. Not really a project, it’s more of a “what the hell are we doing?” complete gut-job renovation. When you say the words “what the hell are we doing” out loud in the middle of a project you know you are fully committed to what you just started! When we bought the house in August (found here) we knew we wanted to ‘rearrange” the master bedroom/bath to make it more functional for us. Since it’s January, it’s cold out, and the boat’s in storage, there is no better time to start swinging a hammer. The layout of our bedroom looked like this (yes, that’s past tense):
Now it looks a little like this:

Yes, that’s plaster, not drywall….and I won’t tell you how heavy it is. 48 hours ago we had an obnoxious number of closets in fairly close proximity. We decided to remove all closets to make way for one very large, custom built, walk-in closet…like we did at our first home (found here). This map marks all the walls on their way out:
Yeah, that’s a lot. My reaction as well. It didn’t seem over-whelming until we started swinging hammers. In some weird universe I thought all the demo would be complete in one weekend….not so much. It’s definitely going to take us one more week (working after our real jobs), minimum. On the plus side, we have a plan! We hired architect Aric Margolis to design the space. He provided us with this design:

It was a good plan but we ended up altering it slightly. We wanted a larger closet and felt like we could utilize the wasted space in the hallway and closets better. This is our end goal for the master suite:

Continuing to swing the hammers is whats on this weeks list. Most of the walls are gone. The two walls left to be demo’d: the load bearing brick wall (was once a sunroom) and the long wall in the bath that will become the shower. I am willing to bet my muscles will remind me tomorrow of all the hard work we put in this weekend! Until then, wish us luck!!!
New Year, New Furniture, New Den!
Slacker=Me. Yep. I have officially been lazy the past month or so. Not lazy as in I didn’t do any projects, lazy as in I didn’t feel like blogging about them. I completed several projects over the holidays. Most of the DIY’ing was in preparation for the ginormous Open House we threw the Sunday before Christmas. I invited 100 people thinking “it’s Christmas, people will be away” but we ended up having a total of somewhere around 75 guests. We ‘did it up right’ with a plethera of food catered by my brother and a stocked bar, manned by Men in Black Bartending. It was a smashing good time. But anyhow…before the big shindig took place we gave the den a big makeover by painting the paneling, buying a new sofa and love seat, and adding a cowhide rug (found here). While we waited for the two leather club chairs to be delivered I decided to paint the stone on the fireplace. I lived with the fireplace for a few weeks, but the orange-ish hue of the stone was too much of an eyesore in this newly updated room.

With left over dark grey paint I got to work with my paintbrush.

I was really hoping to use a roller for most of the painting but the stone surface was just too bumpy. I found a paint brush worked much better so it ended up taking a little over two hours which was nothing compared to the 26 hours I had in the fireplace at our first home!

Much better, yes?! I wish it had a little more depth, but all in all I am very pleased with the final product. One night when I can’t sleep I may try adding a little contrast by accenting some stone with a lighter grey paint. You may have noticed the new coffee table. I moved the brass table that was previously in the room to our living room and found this Noguchi table at a local furniture store. I love how the modern table has become the centerpiece of the room. I also painted those three vases on the hearth white so they would stand out against the grey paint and add a little balance.

The most comfortable part of phase II on this makeover are the two leather chairs and ottomans we patiently waited 8 weeks to arrive. They are Broyhill in flat-ish black leather. My favorite part is the nailhead trim. I wasn’t going to settle for a club chair without nailhead. My only disappointment is that the ottomans are so large you can barely see the metal accent. boo. Oh well.


Overall, we are very pleased with the outcome of this room. The transformation is 180….woot, woot!

I have big plans for the back of those built-ins. Not sure when I will get to it, but it involves linen fabric and liquid starch. All the supplies have been purchased, I’m just waiting for the perfect moment to get on it.
But anyways….now that the holidays are over we are ready to get back into the groove…and let me tell you, 2013 is the year of a VERY big project in the Bauer household….details to come!
Panel, Panel, on the Wall….
I think there will always be an ongoing debate of “should you paint it?” when referring to any wood surface. I’ve learned not to ask the question because in the end we are the ones who have to live with it. It always seems (without a doubt) that the men say “don’t paint the wood!” and the girls say “do it!”. This time I am referring to painting the cherry paneling in our den, just like I painted the cherry cabinets in the kitchen (kitchen makeover found here and here).
Before we bought the house our den looked like this:

Then we moved in and temporarily threw a few old couches into the room until we could decide what to do with the space:

I agonized over painting that solid wood paneling night after night. I even slept on it for well over 2 months. I finally came to the realization that if I wanted this room to become ‘me’ I needed to suck it up and paint the damn wood. This cave-like room is located off our dining room and leads outside to the patio. It’s where we watch TV and relax every night. It’s where the boys gather to watch the game. It’s where the puppy’s sleep when we’re away.

The wood is beautiful, but it’s just not me. I feel like it dates the space and makes the room feel dark. By removing the blinds and cornice boards we got a little more light into the space but it just wasn’t enough.

A few Thursday’s ago after work I decided to grow a pair and just do it. I taped-off the crown moulding, floor, and brick fireplace. We pushed all the furniture to the middle of the room and secured paper to the floor.

Ryan and I both took that Friday off to start this project since it would be the last 70 degree day we would have before winter. We needed to be able to remove the wood slider for painting plus allow proper ventilation since oil primer over wood is a must. We would have loved to use my new paint gun to complete the task, but there is absolutely, positively, no way I will allow oil anything to pass through my brand new TrueCoat paint sprayer. So needless to say we did it all by hand.

Of course I started with my go-to oil primer by Kiltz and covered my paint tray with tin foil. (I am too lazy to wash a tray and I was out of liners). I was very nervous on my first stoke, but that soon passed as the fumes started to distort my brain function.


The slider was removed fairly easily and I was also able to apply a coat of primer. We decided to paint the inside part of the slider black to give the room a modern pop and keep it consistent with the interior door that we previously painted black (found here).


It took the entire morning and afternoon to apply the oil primer to the room, including the built-in’s, but I knew in the long run it would be well worth it (at least in our eyes). We took a small dinner break then I was back at it later that night. Apparently I don’t know how to stop.
I broke out the enamel paint (in bright white) and started my first coat on the trim and built-ins. Because I had such good luck with the Sherwin Williams Acrylic Enamel paint in the kitchen, I decided to spring an extra twenty dollars a gallon and use it for the built-in’s and trim in the den. This paint is regularly priced $63.99…I got it on sale for $45. I didn’t necessarily need to use enamel paint on the trim, but because the built-in’s were gonna be enamel I wanted all the wood trim to match.


It ended up taking 3 coats of paint on the crown moulding and trim. I was really hoping for two, but sometimes you just don’t win. The trim took about two days, so on Sunday I was able to finally begin painting the walls. I don’t remember the exact color of the paint, but we’ll categorize it as ‘light grey’. It’s actually the color we used in the office at our old house…a tribute to our first love, haha.


The paint color actually turned out a little lighter than I wanted, but at the risk of being a perfectionist, I decided to let it be……….for now. I debated on painting the fireplace, but we’ve decided to live with it for awhile before we make any hasty decisions. For the record, Ryan’s vote is to paint it grey, like the color of the mortar.
Before I reveal the complete after photos, I’m gonna show you something I did to one of my dumpster dives…ok, it wasn’t really a dumpster dive. It was a curb pick-up but dumpster dive just has a nice little ring to it. This traditional table was left to the waste side so I scooped it up along with 4 other matching pieces.

In true Michelle fashion, I bought some oil-based spray primer and got to work.

And while I was at it, I decided to give one of it’s buddies a little makeover as well.

I cleaned both pieced and de-glossed them. I didn’t bother to sand the surface because I used oil-based primer and because these tables are only temporary until I find something I really like. After a coat of primer they started to transform.

I used Rustolem’s high performance enamel spray paint in black semi-gloss.

They look decent for now. One day we’ll upgrade.

I’m thinking about adding some white paint along the grooves on the sides. See the ‘swirl’ detail on the side and front? Jury’s still out.
Before we started this 3-day-wood-paneling-extravaganza we ordered some new furniture which you may have noticed. Yep,those tan microfiber-hand-me-down sofa and loveseat are gonzo. I craigslisted them and we bought a new herringbone sofa and loveseat. I know the rule now-a-days is that your furniture isn’t suppose to match, but I just couldn’t do it in this room. With the layout of the room it would look odd if they were different, in my opinion. So without further ado….our new den sans cherry paneling:


The back wall (where the recliner is temporarily sitting) will eventually house 2 new chairs. We ordered black leather chairs and ottomans from Broyhill to occupy this space (with a side table between). Those will become “our seats”. It’s been 5 weeks, so hopefully they will be delivered within the next week or so. Ryan didn’t want to give up his recliner for the sake of interior design, but when I showed him how comfortable a club chair and ottoman with nailhead trim can be he caved. Sort of.

I plan to remove the brass cocktail table and replace it with something more contemporary. The table (although beautiful) just doesn’t fit this room. I still would like something with glass so it doesn’t completely hide the cowhide rug. Did you see the cowhide rug?! I am in love. I took a gamble and ordered it online after pinning about a gazillion cowhide rugs on Pinterest (like this one, this one, and this one). Yep, it’s real. It took the dogs a minute or two to accept the new piece into our home, but after several sniffs we’re all good! The rug itself is fairly soft but has a funny cowlick at the nape of (what I expect to be) the neck. My friend Felicia won’t touch it…haha.
Obviously the room is still a work in progress but it’s coming along. It feels more open, brighter, and contemporary. It feels like ‘us’! And in case you forgot, let’s take one more look at the side-by-side before and after:

P.S. I love the fact the Tulipai made it into both the before and after shots of the room…#Tulipaiphotobomb
P.P.S. Happy Thanksgiving, Ya’ll!
10 Day Kitchen Makeover Part II
The most exciting part of this whole kitchen makeover (other than the finished product) is that I was given an awesome early birthday gift from Ryan! Like most 32 year old girls, I asked for a paint sprayer. Yep, I’m for real. I do not kid. I. asked. for. a. paint. sprayer. You could probably categorize ‘paint sprayer’ in the ‘vacuum’ column of things not to give a woman for her birthday, but let me tell you I was (and still am) SUPER STOKED! Not only did i get just any paint sprayer, Ryan sprung a few more buck-a-roo’s and bought me the Graco TrueCoat Plus from Lowes!

Ryan was initially worried it would be too heavy for me but I convinced him my arms could handle it by saying “the beach is that-a-way” (while flexing my toned biceps and pointing east). Ryan also realized how much he was saving in the wallet department by refinishing the cabinets rather than buying new, so it was worth the splurge. But enough with the sidebar, back to the kitchen makeover. Part one can be found here in cased you missed it.
I worked diligently Monday, Wednesday, Thursday and Friday when I got home from work. (Tuesday, not so much. I reserved Tuesday for a well deserved happy hour with my girls.) The oil primer that I applied on Sunday (via roller) had 24 hours to properly dry so Monday I began working on the fronts. Because I can be a tad lazy every now and then, I opted for Kiltz oil-primer in a spray can. I wanted the smoothest finish on the ‘show side’ and thought this would be the best/fastest/easiest way to achieve it. (Lord knows I wasn’t about to put oil-primer in my brand new, never been used, paint sprayer). It ended up costing me about $65 in spray primer, but way worth it in the long run.


The spray-can primer was killer. It only took me about 45 mins to spray the fronts of all the doors. If I wasn’t so cheap thitfy, I would’ve sprung another $65 to do the back side. I forgot to snap a pic of the doors all primed and pretty, so this picture of the primed and wrapped drawers will have to suffice.

I spent all day Wednesday obsessed with USPS tracking. I was patiently waiting for the arrival of my new cabinet hardware! I scoured hardware stores online and locally for weeks before starting this project. I knew I wanted an oil rubbed bronze finish (ORB), I just didn’t know what style pull to go with. Did I want those cup pulls, like this:

or something fancy and rustic like this:

In the end Ryan and I both decided we wanted something modern and contemporary. We knew ORB would be a nice contrast to the cream cabinets and would play off the dark flecks in the granite, so the Amerock Oil Rubbed Bronze Cabinet Bar Pulls became the winner!

We bought 41 of the 7″ pulls for the ‘normal size’ drawers/cabinets and 7 of the longer 13″ pulls for the large drawers below the cooktop and the 4 over-sized pantry doors. I was hesitant to spend so much money on those darn drawer pulls (those suckers are expensive!) but my mom convinced me it’s the “jewelry of the kitchen”. She’s so smart. I never thought of it that way. You can only imagine my disappointment when I got home from work and saw this banged up, halfway open package on my doorstep:

Ryan and I frantically ripped open the package and started counting those bad boys to make sure there weren’t any missing in action. Somehow all 48 pulls made their way safely from the warehouse in Nowheresville, USA to our door step!
Disaster averted, I started back on the kitchen priming. After all, the cabinet frames that I sanded and deglossed on Sunday still had not been hit-up with a coat Kiltz oil primer. I can gloat all I want about my drawer pulls, but the cabinet frames won’t prime themselves!

Once I stood back and looked at the progress, I could finally start to see my vision. Even though it’s was only an uneven coat of primer, it was starting to transform!


It took about 5 hours to prime all the cabinet frames. That ended up being 4 hours more than I anticipated…haha. Needless to say, I called it a night.
Thursday morning our house was still filled with the aroma of oil primer and I mentally jumped up and down in excitement of the transformation taking place as I walked into the kitchen. I sat restlessly at work the entire day, just itching to get home and finally start actually painting. Five days of prep had done me in and I. was. ready. to. paint! As I mentioned in Part I of the Kitchen Makeover, I bought 2 gallons of Sherwin Williams Pro Classic Acrylic Latex Enamel paint in Panda White but in the end had to go back and get gallon #3….that paint sprayer eats the paint.

I started on the cabinet frames that evening after work. I used my handy 2″ cut-in brush from Sherwin Williams (I’m sure you’ve heard me go on before about how great that brush is, so I will spare you) and a brand new 4″ smooth foam roller. It took right around 4 hour to apply the first coat of paint. About 3 hours longer than anticipated, again…haha.
Friday: The day of sprayer excitement! (which of course calls for ridiculously staged photos of my excitement).

Yeah, you could say I was just a little pumped to finally start spraying those cabinet doors and drawers! We ended up preparing two spray stations since there were so many doors and drawers. The garage held the majority of the pieces while the overflow went into the basement shop area. We got in a little practice on some scrap wood, then went to town on the backsides of the doors. We applied thin coats of paint so it wouldn’t run. We had to keep the sprayer back a good 18″ or so to achieve this (hence why so much paint was used/wasted).

We felt we were fairly intelligent by starting out on the backs of the doors since it was a brand new sprayer. We’ve both used sprayers in the past, but it was probably best to get the hang of it so we didn’t ruin anything. It only took about 10 minutes to spray all the doors in the basement so we moved upstairs to the garage and gave those doors their first coat of Panda White enamel paint!

We completely covered the floor of the garage and the basement as well as the walls before we sprayed. A sprayer like the one Ryan bought me can put off some killer over-spray! Also, on a side note: like most spray guns, the canister only holds 32 oz of paint so we were constantly filling that thing up. I don’t want anyone to think we just went about spraying all of our cabinets with one initial fill up. We were constantly unscrewing, filling, and re-screwing that thing….major UGH! It really only took about 45 minutes. I applied a second coat of paint to the inside cabinet frames, then called it a day.
2nd Saturday: the cabinet doors were beautiful, smooth, streak free, aka: glorious. The paint was completely dry so we were able to flip the doors and continue the spray process on the front sides. I also decided the kitchen table could use a little face lift. The matching kitchen set was left to us by Ryan’s parents. I didn’t take any pictures, but imagine Michelle setting up a bunch of cardboard pieces in the grass and spraying the cherry table and chairs with her brand new spray gun.
2nd Sunday: Everything is dry. Ryan broke out the dill and started measuring and drilling holes for our new hardware!


Remember how we had 48 pulls to install? Well, they were not all installed on Sunday. We spent several hours getting the new oil rubbed bronze pulls drilled and screwed into each door/drawer, then we screwed the hinges back in and hung each door as they were completed. (I numbered each door to make sure it went back to it’s original home). But needless to say, this process went well into 2nd Monday. After 10 days (Saturday to Monday) every kitchen drawer was finally in and each cabinet door hung. The tape was peeled, the spray gun cleaned, and the drill back on the charger. I am pretty sure more than one hundred squeals of excitement exited my mouth. I’ve been in love with so many DIY projects in the past but this one by far Takes. The. Cake. Not just any cake, it takes the Maggie Moo’s Better Batter Ice Cream Cake, to be exact. Are you ready??

Are you as speechless as I am???!! The granite completely pops against the cream cabinets. It becomes it’s own show piece. The drawer pulls (or ‘jewelry’ as my mom calls them) completely pop off the doors and add a little contemporary zing to this somewhat traditional kitchen. Did you notice what I did to the table? I left the top natural and only painted the legs. I may change up the chairs with some black paint, the jury’s still out on that one. What do you think???
Without further ado, here are pictures of the finished kitchen from almost every angle….


And one last reminder of the before and after…
Needless to say I am totally smitten kittens on this project!!! I just sat in the kitchen and stared at it for at least two hours after it was complete. Ryan and I are both excited about how a few coats of paint, 10 days of sweat equity, and some new hardware can transform a dark cherry kitchen into a contemporary, open, and inviting space! Next step? Tackle the lighting and decide on a paint color (did you notice all the patch holes?)!! I’d like to remove the fan and add a chandelier over the table and add some lighting over the island! As far as paint, I have absolutely no idea…..
What do you think? Are you smitten kittens too???!!!
P.S. The second best part of this project was the reveal to Ryan’s parents. They are completely in love too. I wish I could have caught their reaction on film….Oh well!
P.P.S. The cabinet paint appears really white in these photos, but it really is a cream color in person.
10 Day Kitchen Makeover Part I
It didn’t take me long to start decorating our new home. A few weeks ago I mentioned how I started by painting the walls and wainscoting in our dining room (found here). Apparently I needed more of a challenge for project #2. After discussing options about what to do with our kitchen, Ryan and I decided to make that second on the ‘to-do’ list.


We played around with several ideas, but ultimately decided on painting the cherry cabinets. I’m not going to justify myself to anyone because I don’t feel like I have to. We wanted to paint the cabinets to brighten the room and add a little contrast. You may disagree with our decision, but we are ultimately the ones who have to live in the space. Plus, the cabinets are about 20 years old with some wear so they needed a little love no matter what.

We decided to paint the cabinets a soothing off-white color. Normally I am I bright-white kind of girl (I painted our first home’s kitchen cabinets white) but because the granite countertops in our new home have a cream-ish background through them, it just wasn’t an option…hence how we settled on cream. After several runs to Sherwin Williams to pick out paint swatches, I settled on Panda White, a complimentary off-white color.

It can be intimidating to paint cabinets, but knowing the right steps is key. The most important step is preparing the wood correctly and buying the right paint. I like to prime all wood projects (mentioned here) with Kiltz oil-based primer. Oil primer has a better bond than latex, and my feeling is: when you’re putting forth so much effort, why skimp with latex? The paint you use on the cabinets is also key. I used Sherwin Williams Pro Classic Acrylic Latex Enamel:

The paint is a little pricey ($55 a gallon) but it goes on easily and dries smoothly without marks, and will not cause the cabinet doors to stick after painting. It also doesn’t show any finger marks. In short, it’s just a better, harder finish that will hold up to kitchen wear and tear.
I started the kitchen transformation on a Saturday and finished the following Sunday. I worked every night after work (except one) and 12 hours/day on the weekends. It wasn’t completely drawn out, but it wasn’t a “weekend warriors” kind of project either. Are you ready for the breakdown??? Warning: I am squeezing 10 days of work into two posts so this is gonna be lengthy, prepare yourself!
1st Saturday: I removed all 48 (yes, I said 48) cabinet doors and drawers from their hinges. I didn’t realize how many doors and drawers we had in our new kitchen: the removal process took almost 2 hours!


I carried all of the doors and drawers outside, where I setup a sanding station. I used two saw horses and an old door to create a table to sand all those surfaces. (I forgot to mention, the night before I removed all the knobs and puttied all the holes with wood filler to prep for Saturday).


I sanded for 5 hours that day, ugh. Ryan helped me wipe the doors down afterward, bring them back inside and we called it a day.
1st Sunday: I dragged all 48 doors and drawers back outside for some deglossing. Deglosser removes oil, grease and any other dust left on the doors that may cause the primer not to adhere as well.

After two hours of deglossing it was time to sand all the cabinet frames. I took my sander and 200 grit sandpaper indoors to make some sawdust..


I didn’t need to completely remove the finish, I was just sanding enough to rough it up for the oil primer. Immediately after wiping the dust off the cabinet frames, I deglossed. While I deglossed, Ryan set up all the prepped doors in the garage to get them ready for oil primer.

I used Kiltz oil primer and rolled the backs of all the cabinet doors with a 4″ smooth foam roller. I like to start on the backs just in case there are any imperfections when they are flipped.


After a 12 hour work day, we called it quits. Day 2 down of our 10 day kitchen makeover and we were already twenty something hours in! Even though the process went slower than anticipated, it was still very thrilling to see my vision start to come together. Stay tuned for part II of the kitchen makeover which will include the reveal!
Dining Room Diva.
Now that we are officially moved in and closed on our second home it’s only appropriate that I roll up my sleeves and get down to some DIY. In case you missed it, you can find the new house tour here.
My first project is the dining room. I have no specific plan to number/rank each room I want to tackle, but somehow the dining room became lucky #1 on the list. To give you an idea of the first floor layout of the new house, here is a mock-up (not to scale) floor plan. Said dining room is circled in blue.

It’s kinda the heart of the home. It’s off the kitchen, connected to the living room, and you have to walk thru it to get to the TV room and garage. No better place to start. Before we moved in this is what the space looked like:

After we moved in (and before our furniture arrived) this is what the space looked like:

The room is about 13×13. It has amazing wainscoting below the chair rail and crown moulding on each wall. It’s hard to distinguish these beautiful wood accents because they slightly blend into the wall. My goal is to make these upgraded features really pop. First and foremost I removed the valance and sheers from the windows to really open up the space.


After starting this project, I realized I was doing it backwards: I painted the walls first. Looking back, it would have been much easier to paint the trim first then the walls. Oh well, you live and you learn. I decided to use the same grey (I don’t recall the name) we painted in the basement of our first home (mentioned here). I loved that glorious grey. (I really slacked here and produced no photos of this step. oh well.) Here is the grey against the beige wainscoting, trim and crown:

Once the beige walls were covered with two coats of grey paint the next step (and most labor intensive) is getting that trim to really pop. The trim is a creamy-beige color. It’s throughout the entire house. Naturally, I have a fetish for crisp, clean, white trim so converting all the trim in the house will be a long term project (and that’s ok). Because the trim is very glossy I was told by my local Sherwin Williams guy I need to prime before slapping on some white paint. Ugh. So priming I a-go….

I used Sherwin Willimas Multi-Purpose Primer. It’s zero VOC (no fumes) and has great coverage. This is my go-to primer for almost any (non-furniture) job. Even with just the primer (and late at night) you can start to see the difference between beige and white. wowza!

One thing I took into consideration when agonizing on converting the house to white trim was the windows. Yep, you guessed it, they are also painted creamish-beige. By converting the trim to white it also means I have to paint all the windows white. Now you can see why this conversion will be a long term project. I taped off the window to carefully apply a clean coat of white primer and paint as well.

The white wainscoting and bright white trim & crown really make this room pop against the grey walls. I can’t put into words how excited I am with this transformation. It is so ME. A touch of classic with a contemporary twist.

Aside from the paint, my second most favorite part of the transformation is the chandelier. It’s from the Home Depot, Hampton Bay’s Elora Collection. It’s on sale right now super-cheap (I wish I hadn’t looked).

Because every room deserves a little drama I decided to take this dining room one step further and paint the louver doors. Nope, I didn’t paint the beige doors white as you would expect. I instead gave them drama!

I did a little research on interior black doors and fell in love via the internet. I wasn’t sure how I would feel about them in my house so I figured the perfect place to give them a ‘go’ was the dining room before I commit to the whole house.

I primed the doors with tinted primer then painted a black semi-gloss that I had on hand. It took about 2.5 seconds to determine I was in love.

After hanging the ornate black mirror that previously hung in our first home’s master bathroom, I call this room finished for now. (I may paint the mirror white, the jury’s still out on that one).

Of course the room still needs some art and accessories, but one thing at a time. I would really like to invest in a new round dining table. I feel our pup-height table doesn’t fit well into this formal dining space. Our first dining room was more casual so the table felt right, but now it feels a little parochial. Ideally I would like something large enough to seat 8-10. Maybe I can coerce my favorite father-in-law to build me something unique. We shall see. In the mean time, on to the next room!
**UPDATE**I intentionally hung my drapery panels higher than ‘normal’. I do not plan to let the panels hang that far off the ground, I have plans to add length with accent fabric which will pool on the wood floor….just to clarify. I didn’t want you to think I was wearing ‘high-waters in my dining room…haha!
